How to Set Up Outlook 2007 for Windows to Send and Receive Email
How to Set Up Outlook 2007 for Windows to Send and Receive Email
-
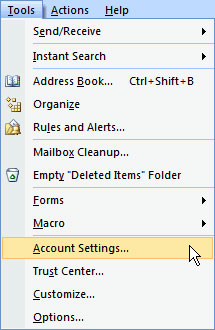
Open Outlook. Select Account Settings... from the Tools menu.
-
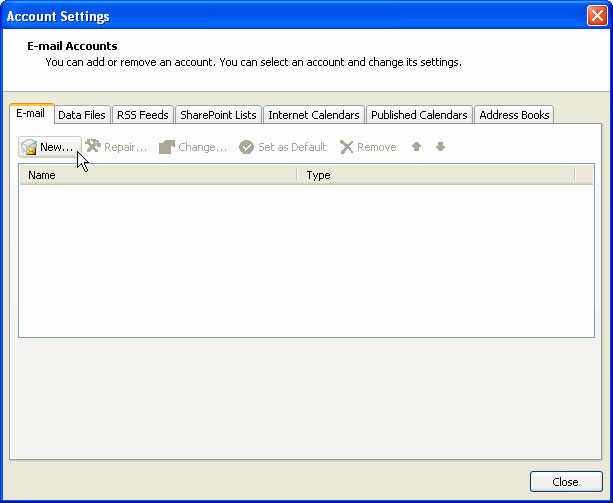
On the E-mail tab, click New.
-
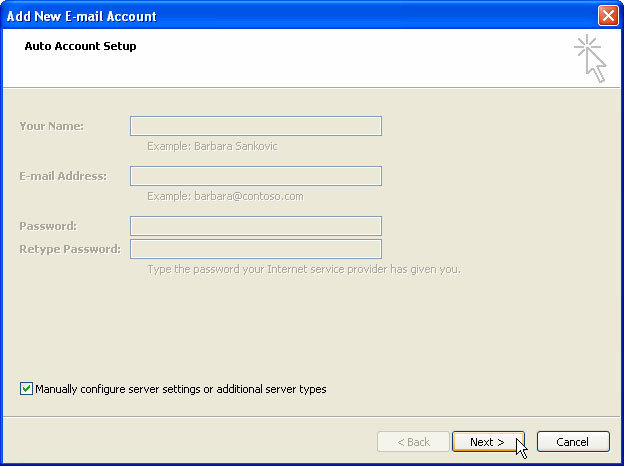
Select "Manually configure server settings or additional server types" and click Next >.
-
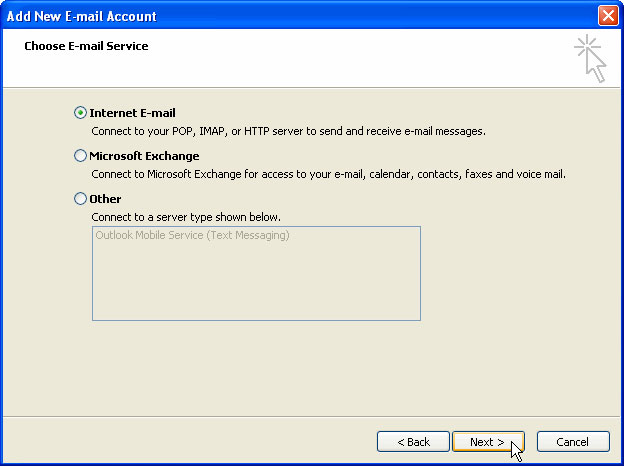
Select Internet E-mail and click Next >.
-
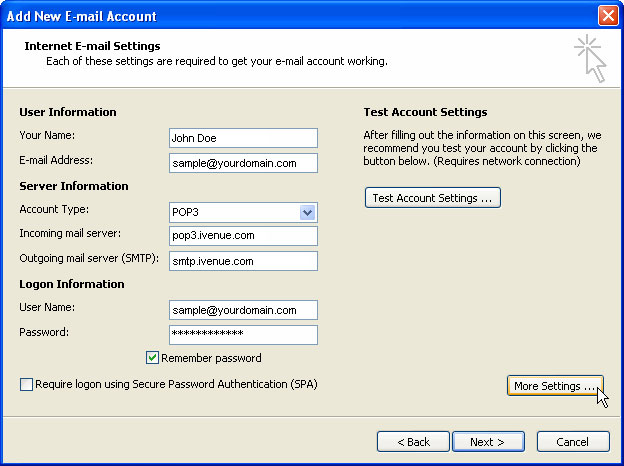
Enter the following information for E-mail Accounts.
- Your Name: Enter the name you wish recipients to see when they receive your message.
- Email Address:This is the address that your contacts' email program will reply to your messages. This is also the address that will get recorded in your contacts' address book if they add you as a contact.
- Account Type: POP3
- Incoming mail server: Enter mail.domainname
- Outgoing mail server (SMTP): Enter mail.domainname
- User Name: Enter your full e-mail address
- Password: If you wish for Outlook to save your password, check the box labeled Remember Password and enter your password in the text field.
- Click More Settings...
-
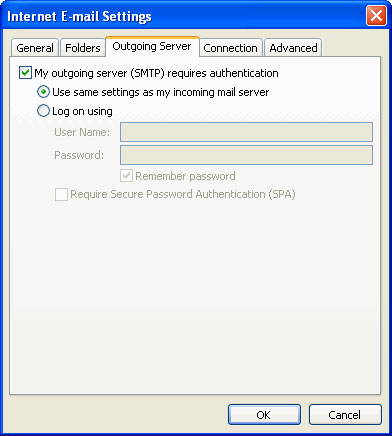
Click on the Outgoing Server tab, and check the box labeled My outgoing server (SMTP) requires authentication. Then choose to Use same settings as my incoming mail server
-
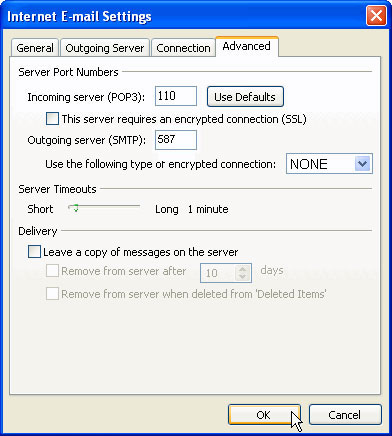
Click on the Advanced tab.
- Under Incoming Server (POP3), the port number should be set to 110.
- Under Outgoing Server (SMTP), the port number should be set to 587.
-
Click OK
-
Click Next. Click Finish.
- These instructions are intended specifically for setting up e-mail on Microsoft Outlook.
- I’ll be working from Microsoft Outlook 2010 (specifically version 14.0.7116.5000 [64-bit]).
Step 1: Add a New Account
Click Add Account.

Step 2: Select Manual Configuration
Select the radio button for Manually configure server settings or additional server types.

Then click Next
Step 3: Select E-mail
Select the radio button for Internet E-mail.

And then click Next
Step 4: Configure User Information
Your Name should be your name as you want it to appear in e-mails that you send.
E-mail Address should simply be your e-mail address.

Step 5: Configure Server Information and Either POP3 (110) or IMAP (143)
If you’ve configured your e-mail in Cpanel then you can either select POP3 or IMAP for your Account Type .

For IMAP or POP3, the Incoming mail server should be set to the correct hostname. Generally speaking, this will be mail.yourdomain.com or similar.
For SMTP, the Outgoing mail server (SMTP) should be set to the correct hostname. Generally speaking, this will be mail.yourdomain.com or similar.
Step 6: Configure Logon Information
User Name should be your username, generally with the domain included. For example, testemail@thebestfakedomainnameintheworld.com instead of just testemail .
Password should simply be the password for your e-mail account.

Step 7: Configure SMTP for Authentication
Click More Settings …

Select the Outgoing Server tab.

Be sure the box is checked for My outgoing server (SMTP) requires authentication , and then select the radio button for Log on using .

User Name should be your username, generally with the domain included. For example, testemail@thebestfakedomainnameintheworld.com instead of just testemail .
Password should simply be the password for your e-mail account.
Click OK
Step 8: Finish and Test Settings
Check the box for Test Account Settings by clicking the Next button , and then click Next :

Assuming the tests complete successfully, click Close :

Step 9: Setup Complete
That’s it, Microsoft Outlook 2010 should now be setup to receive e-mail!
Click Finish

Ports to access POP and IMAP mail servers
For networks, a port means an endpoint to a logical connection. The port number identifies what type of port it is. Here are the default email ports for:
Secure SMTP (SSMTP) - port 465
IMAP4 over SSL (IMAPS) - port 993
Secure POP3 (SSL-POP) - port 995
*Though SMTP generally uses port 25 for connections, port 587 is actually the preferred port for outbound SMTP traffic due to the widespread abuse of port 25.
|