It is strongly recommended that you backup your database at regular intervals and before an upgrade.
Backup using cPanel X
cPanel is a popular control panel used by many web host. The backup feature can be used to backup your MySql database. Do not generate a full backup, as these are strictly for archival purposes and cannot be restored via cPanel. Look for 'Download a MySQL Database Backup' and click the name of the database. A *.gz file will be downloaded to your local drive.
There is no need to unzip this file to restore it. Using the same cPanel program, browse to the gz file and upload it. Once the upload is complete, the bottom of the browser will indicate dump complete. If you are uploading to a new host, you will need to recreate the database user along with the matching password. If you change the password, make the corresponding change in the wp-config.php file.
Using phpMyAdmin
phpMyAdmin is the name of the program used to manipulate your database.
Information below has been tried and tested using phpMyAdmin versions 2.5.3, 2.5.7-pl1, and 2.6.1-pl3 running on Unix.
Detailed options are listed below, though in most cases you will be fine with the default export options.
Backup Process with phpMyAdmin
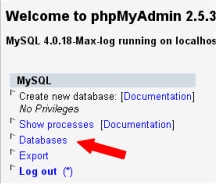
- Log into phpMyAdmin on your server
- From the main login screen, select 'Databases'
(You may not need to do this step)
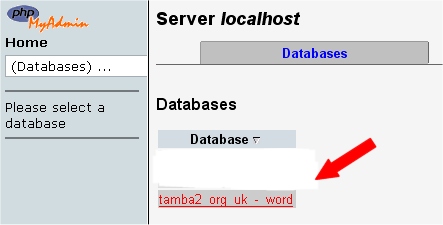
- Now click the name of your database - or your WordPress database if you have several databases.
(Your screen may look slightly different, depending on the version.)
- The next screen will show you all the tables inside your WordPress database.
Ignore those, and click the 'Export' tab on the top set of tabs.

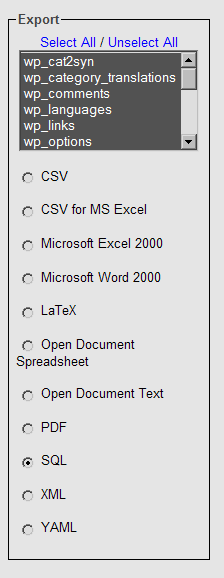
- Look at the left box at the top of the Export section. All the tables in the database you selected are in that box.
- If you have other programs that use the database, then choose only those tables that correspond to your WordPress install. They will be the ones with that start with "wp_" or whatever 'table_prefix' you specified in your 'wp-config.php' file.
- If you only have your WordPress blog installed, leave it as is (or click 'Select All' if you changed the selection)
- Ensure that the SQL radio button is selected.

- The SQL section
- 'Structure'
- 'Add DROP TABLE / VIEW / PROCEDURE / FUNCTION'
- 'Add IF NOT EXISTS'
- 'Add AUTO_INCREMENT' and
- 'Enclose table and field names with backquotes'
Tick the following boxes:
- The DATA section
It doesn't matter too much what you check here. So long as you check the DATA box itself, the Complete inserts and Extended Inserts are mostly cosmetic changes to the output style, though Extended Inserts can help if you are having issues with the file size.
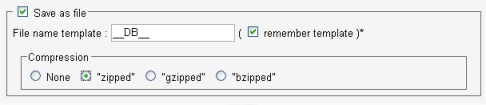
- Tick the 'Save as file' option, and leave the template name as is.
- Now click 'Go' and you should be prompted for a file to download. Save the file to your computer.
Depending on the database size, this may take a few moments.
- You have now backed up your database.
If you wanted, you could download a backup in each of the compression formats. Your choice. For example: None and "zipped": 
Remember - you have NOT backed up the files and folders - such as images - but all your posts and comments are now safe.
| 


